spoon

Dec 12, 2010

Athenos Greek Yogurt Toga party

0 comments
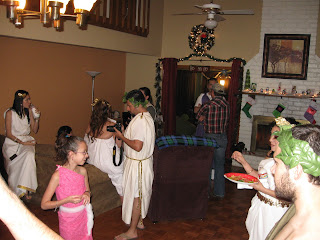
So, this past Saturday I hosted a toga party for Athenos Greek Yogurt! Thank you Houseparty for choosing me to host this shindig, it was so fun!


I got to make fun food and even expanded some of my friends palette choices. One friend had never tried pitas and a few others had never had hummus. I love when people get to experience new foods that they normally would never have tried.


The menu included :
  • Raspberry Chipotle meatballs
  • Pita sandwiches with turkey pastrami, chicken, tomato, cucumber and a choice of either creamy cilantro sauce or creamy chipotle sauce (both made with Athenos Greek strained yogurt)
  • Greek Pizza with spinach, black olives, red onion and cheese
  • Spinach dip (made with Athenos)
  • Hummus
I also made lots of fun Christmas desserts as this toga party was a great excuse to to have a Christmas party!


I also gave out party favor bags with the party favors that Athenos sent. It included a coupon for $1 off of two yogurts, an Athenos stress ball, writing pad, pen and a free yogurt!


The yogurt is really good! I love that you can decide how much of the fruit to add to your yogurt or decide not to add it altogether. My favorite is the peach one. It's definitely also a great breakfast on the run because you don't have to stop and slice up the fruit of your choice, it's already done for you. I LOVE IT!

My Wal-Mart only had 14 yogurts so I bought them out with my complimentary coupons and even had a few coupons left to give as game prizes. We played this cookie game: Face the Cookie!  It was so fun!


 THANK YOU Athenos AND Houseparty for a great time!!!


~Mrs Galvan~

Jul 2, 2010

Summer Potato Salad

1 comments
Summer Potato Salad

1.5 pounds Baby Dutch Yellow potatoes
1 tsp kosher salt
½ white onion
1 stalk of celery
2 baby kosher pickles
2 Tbsp mustard
½ cup mayonnaise
½ tsp dill weed
1 Tbsp of minced garlic (one garlic clove minced)

Baby Dutch yellow potatoes are so buttery and perfect for potato salad in my opinion.

Take your potatoes and make sure they are all around the same size. I took them all and cut them in half, some of them in quarters if they were bigger to make sure they were all about the same size.

Why should we do this? It’s so the potatoes will all cook evenly and at the same time.

Put all your potatoes in a pot to boil—with just enough water to cover the potatoes. Then salt the potatoes and water with the salt. Boil for 10-12 minutes.

Don’t start the water boiling until AFTER the potatoes are in the pan. This will cook them all evenly as well.

While your potatoes are cooking it’s time to prepare the rest of the potato salad. In a food processor, chop your onion, celery, pickles and garlic. Set aside.

Drain your potatoes and pour into a medium size bowl. Add your veggie mixture, mustard and mayonnaise and serve up.


This can be served warm or cold. I like it both ways.

Although, I will tell you that letting the potato salad cool and then letting it sit in the refrigerator overnight really brings out all the flavors of the veggies and dill.


Serve with your favorite barbecue or even your favorite sandwich.
~Mrs Galvan~

Jul 1, 2010

Mexican Hotdogs

0 comments
For lunch today I decided to make Mexican hotdogs. This has quickly become one of my favorite quick meals to make. They are just sooooo good! I've made them as healthy as possible without taking away flavor. The only thing that could have made them better is beans ala charra from scratch and then refried.

**Refried for me just means mashed and with a tablespoon or so of bacon drippings. Mm...how can anyone resist.**

I originally made these because of a blog that I read, Homesick Texan, and then have sort of run with the idea by doing some research on the "Mexican" hotdog. So, here you go. Hope you'll try it! It's totally worth it!

Mexican Hotdogs
Makes 4 servings (2 per person)

8 hotdog wieners (turkey, beef, whatever you like)
8 hotdog buns (I used whole wheat buns)
8 slices of center cut bacon (uncooked)

1 cup Refried Beans (canned or from scratch)—I actually only had a can of pinto beans so I mashed and doctored them up with some bacon drippings, onion powder (not onion salt), garlic powder (not garlic salt)*If you own onion salt, or garlic salt—throw them out—they have so much extra sodium* and about ½ tsp of kosher salt.

Pineapple Salsa:

1 can of pineapple tidbits (I bought the one sweetened with SPLENDA rather than sugar)
2 tomatoes, diced & seeded
½ red onion, chopped
3 Tbsp of lime juice
½ tsp of kosher salt
3 Tbsp cilantro, chopped

Extra toppings: (optional)
Sliced jalapeños
Regular or Chipotle mayonnaise
Mustard
Mashed avocado

Take your hotdogs and wrap one slice of bacon around each one tightly. Try to get the two ends on the same side of the dog and place that side down in a cold sauté pan. Then turn the heat to medium. (By starting in a cold pan you keep the bacon from curling up) Cook until your bacon is nice and crispy and cooked well. Then place on a paper towel to catch any bacon drippings.


While they are cooking get started on your pineapple salsa. Just mix all the ingredients together and store in the fridge until ready to serve your hotdogs. We all should know that any kind of pico de gallo type of salsa is BEST cold.


Then work on heating up your beans. That takes hardly any time at all. I poured a little of the bacon drippings from my hotdogs into the beans since they were canned beans to doctor them up and spice’em up good.

To Assemble:

Take your hotdog bun and spread a nice amount of refried beans into it, place a hotdog in it, add mayo of your choice (or mustard—that’s the way my momma eats them), avocado, the pineapple salsa and top with jalapeños.


(This is a picture from the last time I made them--for some reason the picture of the ones I made today didn't make it into the camera--these dogs are missing the tomato in the salsa.)

Now eat up!

~Mrs Galvan~

Jun 28, 2010

Febreze Party was FUN!

0 comments
So, the FEBREZE party was a ton of fun! We had ice cream, played a few games and enjoyed each others company! Guests got some great goodies too! Here are a few pics to relive the night:)


I hope that Houseparty will choose me to do another party soon! This was a really fun experience and I'd love to do it again!

Jun 21, 2010

Febreze Fresh Summer Party!

1 comments
So I am completely and totally excited that houseparty.com chose me to host a Febreze Fresh Summer Entertaining House Party™ !! I don't even remember how I found the houseparty website but when I did I got all excited because hosting a party like this is something I have been wanting to do!

How did I get chosen?

Well, I went the website and looked through the list of parties that they needed hosts for and then I did a survey so that they could determine whether or not they wanted me to host. Once I was selected they give you just about every resource to help make your party a success! The website gives you access to make e-vites and even keeps track of your RSVP's. It's awesome! This is my first time doing anything like this so my guest list was about 22 people and about 14 are showing up. I'm okay with that since our apartment is not really big.

Last week I received my Febreze party pack in the mail and WOWSERS! My guests will get some nice little goodies. It had everything from free products to coupons and even an apron for me!

The whole point to this party is to get a new product in people's hands before it actually comes out. The product is called "Set & Fresh". It's like those cones people put in their bathrooms but way better.

It's gonna be an ice cream party! YAY! I found these awesome waffle cone cups at the dollar store, gonna buy a couple gallons of ice cream and a bunch of different toppings so everyone can make their own sundaes essentially. Also, gonna have sugar-free options for those of us who can't really put all that sugar in our bodies. Got some other plans for games and such as well.

I don't want to post any pictures of anything yet because I don't want to give it all away today but I will after next Saturday.

This coming weekend is gonna be crazy! We have all our regular responsibilities to take care of at church and then I have this party and we also have a wedding on Sunday.

I'm looking forward to date night tomorrow night with some good friends so that we can relax and enjoy each other a bit before we dive into the rest of the week.

As for home life: things are pretty good. My momma finally qualified for a home health provider which will take some of the stress off of me and the Mr. She's been a bit under the weather but other than that she's doing pretty good. After her stroke her immune system has been a wreck! We had an appointment with her kidney specialist last week and he said everything looks "okay". He said that at this point as long as her kidney function doesn't get worse that she is gonna be alright. My mom has so many things wrong with her and I feel bad because she can't really eat all the things she loves and wants but as we tell her when she gets upset because I won't let her have a second helping of something bad for her (I don't totally deprive of her of stuff), "I want you here to see your grandbabies." She usually agrees and we laugh.

As for babies, well we're trying. Doctor put me on Clomid because my period isn't regular and this is the second month I've been on it so, we shall see. I know it's all in God's hands and He has the perfect time for us to get pregnant but I want a baby already! Please keep us in your prayers.

Well, until another day friends. Love ya'll!

~Mrs Galvan~

Apr 22, 2010

“Trashionista” 2010

1 comments


This afternoon I went to Incarnate Word's "Trashionista 2010" to see the dress I made with my cousin out of Victoria's Secret bags. Apparently, every year on "Earth Day"this school puts on a fashion show where the students make clothing out of recyclable materials. There were some really cute outfits. I was surprised when my cousin came out modeling the dress and it was introduced as a "Leslie Galvan original". Totally made me laugh and smile!


My grandma taught me how to sew when I lived with her. She taught me how to do a lot of things actually—like keep a clean house, cook and do yard work. One thing I learned while living with her was that if I was bored, I shouldn't voice it because then she'd give me something to do…LOL! No but really, I'm really grateful for everything she taught me. She passed away in 1995 right before I graduated from high school.

For those of you who don't know, I do LOVE to sew. I made my very first formal dress for my senior homecoming dance. I found this picture and had to scan it and put it up. It's not the most extravagant dress but it got the job done in 1995…LOL!


My sewing skills also came in handy while in college. One semester as a part of the UTB/TSC Opera company a friend and I spent our entire spring break making costumes for our Spring show. THAT was fun and challenging and if I'm not mistaken some of those costumes are still being used.

These days my desire is to sew some more but well, time doesn't really allow for it. Maybe someday soon, who knows.

I was excited when my cousin asked for my help for her fashion show and I really had a good time making this little party dress to honor Earth Day.

What are you doing to help conserve the earth?

Apr 20, 2010

Migas for breakfast

1 comments

Migas! Oh how I love MIGAS! I haven't had eggs for breakfast in awhile but on Sunday night I made fish tacos for dinner which left me with about 7 fresh corn tortillas that needed to be eaten up. After dinner, the Mr said, "I want migas for breakfast" because he saw the leftover tortillas. I had already thought of it and told him and we both laughed. Those aresome of my favorite moments!

For those of you who don't know what migas are let me explain. It is sautéed corn tortillas with scrambled eggs. Everyone makes them different so as for what else to add to them, I'll tell you what I put in them.


6 corn tortillas (sliced up however you want)

1 ½ cups of egg substitute

1 roma tomato (seeded & diced)

1/4 red onion diced

2 Tbsp of Smart Balance butter

EVOO


In a sauté pan, heat enough EVOO to cover the bottom of the pan on medium heat. Toss in the tortillas and cook until every piece of tortillas is covered in a little EVOO. Then add the butter and onions and cook until onions are translucent. Add the tomato and stir, then pour in the egg substitute and cook theggs completely. Careful not to fry them.

Serv'em up!


Sorry about the paper plate, it's just easier these days! :)

~Mrs Galvan~

Apr 15, 2010

In the mood…to cook!

1 comments
Today I woke up and all I wanted to do was COOK! Suffice to say, it's been an awesome day! I guess I just woke up in the mood to cook:)


For lunch I made a pork asado of sorts with summer squash and zucchini served over rice. It was easy, fast and a one pot meal!

Here it is:

-2 summer squash sliced
-2 zucchini squash sliced
-1/3 of an onion
-1/4 cup julienned carrots
-2 Roma tomatoes (seeded and chopped)
-2 cups chicken broth
-3 pork loin filets (cubed)
-1 Tbsp flour (to thicken)
-1 Tbsp ground cumin
-Salt/pepper to taste
-EVOO


1.In a large pot pour EVOO around like 4 times and allow to heat over medium heat then toss in the cubed pork and allow to get seared on one side.

2.Add ground cumin, salt and pepper and stir.

3.Toss in the onion and cook until translucent. Then add both the summer squash, zucchini and tomato. Cook for 5 minutes.

4.Add chicken broth, sprinkle flour, mix well and cover. Continue to cook on medium heat, stirring occasionally for about 30 minutes. This will soften up the pork so that when you take your first bite it will be soft almost melt in your mouth.


I served it over Ready to Serve Yellow Rice . It was a hit and the Mr. loved it. Sorry, no pictures because I was kind of hungry and forgot to take some. Next time!

The snack I made today came to mind because I was trying to figure out how to use up the 3 bananas and couple of strawberries I had in the kitchen. Tomorrow is grocery day so I need to use up all the fresh stuff so I can get some new stuff.

I did add some flaxseed meal to this recipe as it's a great source of fiber and I've been trying to add it to most things that I bake. It gives baked goods a nutty flavor and is also great in your pancake mixes!


Here's what I made:

Mini-Banana Bundts with Strawberry Cream Cheese Frosting


-1 cup Whole wheat flour (spooned and leveled)
-1/2 cup all purpose flour (spooned and leveled)
-1/4 cup + 2 Tbsp of Splenda Sugar Blend (or 3/4 cup of regular sugar)
-1 teaspoon baking powder
-1/2 teaspoon baking soda
-1/2 cup (1 stick) I Can't Believe It's Not Butter
-3 to 4 mashed bananas
-1/2 cup egg substitute (or 2 eggs)
-1 teaspoon pure vanilla extract
-1/4 cup Bob's Redmill Ground Flaxseed Meal


1.Preheat oven to 350 degrees.

2.Spray 12-cup mini bundt pan lightly with Pam.

3.In a medium bowl, whisk together flour, sugar, baking powder, baking soda, and flax meal.

4.Make a well in center of flour mixture.

5. In well, mix together butter, mashed bananas, eggs, andvanilla. Stir to incorporate flour mixture (do not overmix). Dividing evenly, spoon batter into bundt cups.

6.Bake until a toothpick inserted in center of a cupcake comes out clean, 25 to 30 minutes.

7.Remove cupcakes from pan; cool completely on a wire rack. About 20 minutes.


8.Drizzle tops with frosting .

9.Garnish with fresh sliced strawberries and/or fresh banana slices (I didn't because I used all my fruit for the recipe)


Strawberry Cream Cheese Frosting

-1/4 C butter (room temperature)
-4 oz package cream cheese (room temperature)
-4 oz Light & Fit Carb & Sugar Control Vanilla Cream yogurt
-1/2 C strawberries, mashed up in a food processor
-1/4 cup Splenda Sugar Blend (or 1/2 cup of regular sugar)


1.Cream butter and cream cheese.

2.Mix in the yogurt and strawberries

3.Add 1/4 cup Splenda


This is an easy snack to make so, get to it and let me know how it goes!


~Mrs. Galvan~


Apr 13, 2010

Sandwichon & Love

7 comments
I know I said awhile back that I would post my recipe for SANDWICHON and here it finally is!

The Mr and I LLLLOOOOOVVVVEEEE sandwichon!

For those of you who don’t know what a SANDWICHON is, it’s basically a sandwich cake.The final product looks like an iced cake with fruit and nuts on top but the inside is bread and chicken salad. Most of the time you will see it with pineapple and cherries on top. It really looks like a cake! I don't do pineapple because my taste buds get all swollen so we used mango. Just as awesome!

I’ve found that most people don’t know what it is and it’s really only known in Mexico and areas near Mexico. There are so many different ways to make it too. Some people put pimento spread in it and others use potted meat.

I use chicken salad and it’s my version of chicken salad. Everyone has their own!

FYI: This recipe will make a 1/3 of a cake.

My Chicken Salad
-1/3 white onion
-1/4 cup of shredded carrots
-1 rib of celery
-4 - 5 chicken breasts (boiled)
-1 tsp kosher salt
-Ground pepper
-1/2 to 1 cup of light miracle whip
-1 jar of Del Monte Mango slices in juice

Cream Cheese frosting
-1 8oz package of light cream cheese (softened at room temperature)
-1 8oz container of light sour cream
-1/4 cup of mango juice

1 loaf of whole wheat bread
1/4 cup chopped pecans

First things first: Boil your chicken on medium heat for about hour so that it will easily fall apart when it’s done. Then let it cool and get to work on the rest.

In a food processor add onion, carrots, celery and chop finely. Transfer to a medium size bowl.
By now the chicken has cooled so you can put it in the food processor as well and chop it pretty finely as well. Then add to the bowl with the vegetable mixture and mix together.

Now add the miracle whip and 1/4 cup of mango juice. The chicken mixture should be moist and not dry so if you need to add more miracle whip do so.


Now take your bread and slice the crusts off.

I know, what a waste but you can give them to some ducks or birds or turn them into bread crumbs for later use.

Now will come the cake part: Place 4 bread slices side by side, spoon over and spread around a 1/4 cup of the chicken salad on top, then another layer of bread, and then more chicken salad until the bread and chicken salad are all done. It should have at least 4 layers.


To make the cream cheese frosting: In a small bowl whip cream cheese until creamy and then fold in the sour cream and mango juice. Frosting should NOT be runny.

Frost the SANDWICHON as if frosting a cake with the cream cheese frosting and refrigerate for at least 3 hours.

Overnight is best.

When you are ready to serve it place mango slices on the top of the cake and sprinkle pecans. Slice up like a cake and enjoy!

This is a picture of a finished one that I found because I didn't get a finished picture of ours due to it being eaten up so quickly! Maybe next time.


I think my favorite part about making this was that the Mr and I made it together. It was his idea to try to make it and so we did. We don't usually work well in the kitchen because I'm so OCD about the way things are done. When we made this the only thing we argued about was the making of the frosting...lol!

Mr Galvan, I love you very much and am grateful for you and the way you take care of and love me. Not only are you my husband but you are my best friend. Thank you for all that you do to take care of our family. YOU are amazing! God truly blessed me!


~Mrs Galvan~

Apr 12, 2010

Jamie Oliver's Food Revolution

1 comments
As a foodie this is something I am very excited about!


Click here to sign the petition

The Mr and I have been watching Jamie’s show and have gotten so excited about his desire to help America change the way we eat!

As I’ve struggled with my own weight issues, diabetes and high blood pressure, food and knowing what goes into it has become very important to me. I’ve learned how to read the nutritional information and know what’s important and also know what my personal nutrition allows and doesn’t allow. It’s why we cook at home now and spend way less money eating out.

Before the Mr and I got married we figured that we spent about $800 a month on eating out. Yea, talk about expensive. We are down to half of that, and it’s all on groceries now. Even our date nights for awhile were spent making a special meal and THEN heading out to a movie or fun event.So, not only do we save some money, we eat better!

Of course, now that we are taking care of my mom, date night requires us to go out to eat so we can get out of the house.So, we're spending a little now.

With the thoughts and prayers of a family soon, the Mr and I have been talking about how we will raise our children in food. We both love food and love trying new foods. We’re hoping our children will be too. I’ve been reading, Raising Foodie Kids, for awhile now and am excited for when our opportunity to raise children comes along.

Well, no cooking today as our tile in the living room is being replaced and they don’t think it will be done until tomorrow. We live in an apartment and so we are hole up in our rooms today. It’s not a bad thing just keeps me out of the living room kitchen area due to the dusty mess the people are making.

Thanks to La Fuji Mama for her blog. It encouraged me to blog about this. I have been wanting to, I just hadn't had the chance and her giveaway definitely encouraged me! :)

More blogging later!

~Mrs Galvan

Mar 11, 2010

Focaccia Bread

3 comments
I made Focaccia bread for the first time yesterday and I was really happy with how it turned out.After the bread was done, I sliced it half and made Italian inspired sandwiches:

  • A layer of basil parmesan pesto on the inside of each piece of bread
  • bacon pieces
  • provolone
  • smoked turkey deli slices

Then I sliced the large sandwiches into smaller ones. Their weren't too many left at the end of the night and the leftovers were better:)

As for the Focaccia:

  • 1/2 teaspoon honey
  • 1 package active dry yeast or 2 1/4 tsp
  • 2/3 cup warm water (110 degrees F/45 degrees C)
  • 2 cups all-purpose flour
  • 1/2 teaspoon salt
  • 4 tablespoons olive oil, divided
  • (optional- 1 Tbsp of crushed Italian seasoning)
  1. In a large bowl, dissolve honey and yeast in warm water. Let stand until creamy, about 10 minutes.
  2. Add 1 cup flour, salt, and 3 tablespoons olive oil to the yeast mixture. (This is where if you want you can add the Italian seasoning) Stir until combined and then work in the last cup of flour. Knead the dough until smooth, elastic, and soft, about 7 minutes. Add only enough flour to keep the dough from being sticky. Lightly oil a large bowl, place the dough in the bowl and turn to coat with oil. Cover with a damp cloth and let rise in a warm place until doubled in volume, about 1 hour.


  3. Deflate the dough and turn it out onto a lightly floured surface. Roll out the dough into a rectangle, about 1/2 inch thick. Place in greased 9x13 inch pan or baking sheet. Cover and let rise until doubled in volume, about 40 minutes. Meanwhile, preheat oven to 400 degrees F (200 degrees C).


  4. Poke dimples in the bread and drizzle 1 tablespoon of the olive oil on top. Bake at 400 degrees for 15 minutes.


It's really pretty simple to make...a bit time consuming but well worth it. Hope you'll get to try this!

Coming soon: Sandwichon!

Mar 2, 2010

COMFORT FOOD: Chicken Pot Pie

2 comments
So, I decided one day that after watching Food Network for long enough that I was going to make individual chicken pot pies for dinner one night.

So, I had all the ingredients and as I was making the filling, I realized that my ramekins were, well, ramekins and not big enough to make individual pot pies in. I need some larger ramekins or French Onion Soup Bowls. (hint...hint...anyone...someone...)

I adapted my recipe from The Neeley's. I followed the filling part of the recipe pretty much but didn't bake any part of that in the oven. Here's my version:

  • 4 cups chicken broth (I boiled my chicken breasts and used that broth with some other chicken broth I already had)
  • 1/2 cup (1 stick) butter
  • 1 onion, finely chopped
  • 2 large carrots cut in 1/2-inch rounds
  • 1 rib celery, sliced
  • 2 cloves garlic, chopped fine
  • Salt and freshly ground black pepper
  • 1/2 cup all-purpose flour
  • 1/4 cup heavy cream
  • 3 fully cooked/shredded chicken breasts
  • 1 (9-ounce) box frozen peas
  • 1 package puff pastry dough
  • 1 egg beaten with 1 tablespoon water

Directions

Preheat your oven to 375 degrees F.

In a large saucepan heat chicken broth over medium heat until hot.

In a Dutch oven, melt butter over medium heat. Add onions, carrots, celery, and garlic, and saute until tender. Season with salt and pepper. Add the flour and stir together until it becomes pasty and lump-free, about 2 minutes. Stir in the hot broth, heavy cream, chicken and frozen peas. Bring to a boil then reduce to a simmer.

Sprinkle flour on countertop. I bought some Pepperidge Farm Puff Pastry dough. It comes with 2 sheets. Unfold dough and cut into 9 squares. Spray baking sheet lightly with cooking spray and place 9 sqares on baking sheet. Brush with the egg wash. Sprinkle with kosher salt. Bake for 12-14 minutes. Remove from the oven and let cool til they can be handled.

Ladle chicken mixture into bowl and place one of the puff squares on top of the bowl of chicken filling and served it hot.

You can still hear the "crunch" of the pastry which makes it feel like you're breaking through the pie crust of the original chicken pot pie. Eat up! YUM!


Mmm...COMFORT FOOD!

I'm very happy with the way it turned out. I was so excited, I served it as soon as the Mr. walked in the door from work AFTER I begged him to HURRY UP and get home because I couldn't wait any longer to eat. LOL!

~Mrs. Galvan~

Jan 22, 2010

Poor Man's Crab Cakes

1 comments
So, I was watching a re-run of PSYCH the other night and Sean made Crab cakes with Coriander and Dill and I got to thinking...Mmm...this sounds good but I can't afford lump crab meat today so what can I do???

So, I made TUNA CAKES with Dill and Cilantro!
Here's the recipe:

Tuna Cakes with Dill and Cilantro
(Makes 6 cakes)

INGREDIENTS

2 eggs(for a healthier version 1/2 cup of egg beaters)
2 tablespoons freshly chopped cilantro
1 teaspoon Worcestershire sauce
2 tablespoons mayonnaise (I use fat-free mayo)
1 teaspoon fresh lemon juice
Salt and pepper to taste
1 pound canned tuna (in water) drained and flaked =2 (12 oz cans)
3/4 cup fresh breadcrumbs, more as needed
Panko breads crumbs for dredging
canola oil


Beat the eggs in a medium-sized bowl. Add the parsley, mustard, Worcestershire, mayonnaise, lemon juice, salt and pepper; mix well to combine. Gently fold in the crab meat and fresh crumbs until well combined. (The mixture will be very moist. If it is wet, add a few more fresh breadcrumbs.) Divide the mixture into 6 to 8 portions; flatten gently into thick patties. (Packing the mixture into 1/3-cup measure for each cake will ensure even portions and yield seven cakes. For more or less cakes, use a slightly smaller or larger cup.) Lightly coat the top and bottom of each patty with panko crumbs. If possible, refrigerate for 30 minutes before sautéeing to help the cakes hold together. Heat a 12-inch skillet over medium-high heat. Pour canola oil to generously cover the bottom. Add the crab cakes, in batches if necessary, and fry until golden brown on both sides, about 4 minutes per side. Remove from the pan and drain on a baking rack set on a baking sheet: paper towels work too:)

Here's the picture I got of it. It's not very good but you get the idea:)


Love ya'll!

~Mrs Galvan~

Jan 6, 2010

A Happy New Year!

0 comments
So, I haven't blogged since September...geez...funny thing is I haven't really made anything fantastic since then either. It has been a rough 4 months.

  1. My mom had a stroke on Sept 25th and the Mr and I spent a week with her in Corpus Christi and then had her transferred here so we could take care of her. She was in the hospital til November 25th. Her entire right side is "weakened due to stroke" as the doctor's say. What does that mean? She can't do anything for herself.
  2. My mom moved in with the Mr and I.
  3. November 30th was my last day of work. I had already planned to NOT work starting in January but my resignation came early. So, now I'm my momma's caregiver. It's a lot of work but I love the time I get with her.
  4. December 24th mom went back into the hospital so, she didn't get to spend Christmas with the family. She spent it in the hospital. They found that she was severely anemic and she also has Divirticulitus.
  5. My family celebrated New Year's Eve together for the first time in OVER 10 years. It was awesome! AND mom got out of the hospital on December 31st so even more awesome!
I feel like I've been missing in action for over a month. I miss my job, my co-workers and just the way life WAS--->although I already knew some kind of change was coming. I guess I just wasn't prepared for it. So, it's been rough. Today though, I feel like I'm seeing a light at the end of the tunnel.

I cooked tonight:) Not just boring food but PIZZA! The best part is I re-evaluated my old recipe and made it BETTER! Oh yea, it was the best pizza I've made yet! YUMMO!


Grilled Chicken with bacon, red onion and roma tomato on white sauce. There's also a secret ingredient that just made it all POP! It was so great! Oh and of course cheese! I'm proud of this one!

So, it's a new year with many new things on the horizon! I'm ready or it! (I think)
LOL! We'll see.